Congratulations to vtecmec for winning May/June's Lude Of The Month, with his DIY Turbo BB1 build.
>>> Click Here For Profile <<<

>>> Click Here For Profile <<<

My Honda Accord 2.2 ICTDI Diesel 4 Door Saloon
- prelude_h22
- Posts: 758
- Joined: Tue Jul 24, 2012 6:35 pm
- My Generation: 5G
- Has thanked: 8 times
- Been thanked: 22 times
Re: My Honda Accord 2006 I-CDTI 4 Door Ex Diesel Saloon
Haha - I missed quite a lot here - LOL
No worries chaps!
The N22 in the accord is Honda's first diesel engine and it does have a few issues. In my opinion I think Honda did really well for their first attempt.
The N22 in the facelift accord 06-08 has the revised cam chain and oil pump but all models had the cracking inlet manifold issue.
The manifold issue was covered by Honda but the car must have full service history and the mileage must be no more than 125k - if you meet the prerequisites then they will change it for free. I double checked with brindley Honda and they sent me the original invoices for the work done. (the total came to £800 including labour) crikey! lol
According to research on the accord forums the majority of the VSA modulator problems that people have been reporting have occurred after they have had work done on the car. Which may mean that the modulator could be really fragile and even a light knock to it could damage it of course this hasn't been proven by Honda or anyone and its just the findings from the forum peeps
Dual mass flywheel problems plague all modern diesel cars and not just related to the Accord but it will definitely be expensive when they do go. Thankfully the clutch on my Accord has a really low biting point so I don't need to worry about that for now. The feel of the clutch in the Accord is really nice though. There are no vibrations through to the pedal and its nearest damn it close to a petrol car.
From all the listed issues found on this model of Accord I have yet to experience any of them - (touch wood ) LOL
but from what I read these N22 engines can go on for more than 250k miles on the original turbo
The key point I have read on all the Accord forums and as Thebusofwoe mentions is oil servicing. Change it regularly - and not by the recommended 12k Honda schedule but every 6k miles apparently.
There was an argument that the failing chains and oil pumps on these engines mainly account to poor servicing and neglect. Also people use a lot of after market components oil and fuel filters which the engine doesn't like and can cause running issues. Also many people and garages use the wrong oil for the N22 engine. It is 0w/30 fully synthetic and NOTHING ELSE. Any other grade will result in the cam chain /oil pump failure
Looked after carefully the Accord diesels can be rewarding to own and drive.
The rear callipers are the same on every Honda I have owned. They always seize when they aren't serviced regularly, but the ones on mine are lovely. The car rolls really smoothly and the hand brake holds the car nicely on hills.
Thebusofwoe: That is really strange that you see a lot of the failures on the tourer. Are the majority of them pre face lift (03-05)?? are the majority of the tourers you see tow trailers? (one of the theories that the drive shafts fail too - additional load)
and a quick thank you to @PerformanceAutoworksfor changing the fuel filter, belt mod and brake bleeding
thankfully most of the maintenance have been taken care of now. Probably do with some new brake pads and the installation of parking sensors which I have waiting
@Thebusofwoe
I am also looking to get an OBDII reader and looking at the foxwell NT630 or NT614
Will these tools read the ABS and sub modules on the Accord?
How about the Autell MD802??
Any recommendations??
I do agree though - I think if I didn't have my Prelude then I would have gone for 2.4 Type S but having both a H22 and K24 would have burnt serious holes in my wallet. Some may argue that with the diesel issues it will balance out but the insurance and road tax is definitely cheaper on the diesel. Lots of open arguments here - LOL
Thanks all for the comments
No worries chaps!
The N22 in the accord is Honda's first diesel engine and it does have a few issues. In my opinion I think Honda did really well for their first attempt.
The N22 in the facelift accord 06-08 has the revised cam chain and oil pump but all models had the cracking inlet manifold issue.
The manifold issue was covered by Honda but the car must have full service history and the mileage must be no more than 125k - if you meet the prerequisites then they will change it for free. I double checked with brindley Honda and they sent me the original invoices for the work done. (the total came to £800 including labour) crikey! lol
According to research on the accord forums the majority of the VSA modulator problems that people have been reporting have occurred after they have had work done on the car. Which may mean that the modulator could be really fragile and even a light knock to it could damage it of course this hasn't been proven by Honda or anyone and its just the findings from the forum peeps
Dual mass flywheel problems plague all modern diesel cars and not just related to the Accord but it will definitely be expensive when they do go. Thankfully the clutch on my Accord has a really low biting point so I don't need to worry about that for now. The feel of the clutch in the Accord is really nice though. There are no vibrations through to the pedal and its nearest damn it close to a petrol car.
From all the listed issues found on this model of Accord I have yet to experience any of them - (touch wood ) LOL
but from what I read these N22 engines can go on for more than 250k miles on the original turbo
The key point I have read on all the Accord forums and as Thebusofwoe mentions is oil servicing. Change it regularly - and not by the recommended 12k Honda schedule but every 6k miles apparently.
There was an argument that the failing chains and oil pumps on these engines mainly account to poor servicing and neglect. Also people use a lot of after market components oil and fuel filters which the engine doesn't like and can cause running issues. Also many people and garages use the wrong oil for the N22 engine. It is 0w/30 fully synthetic and NOTHING ELSE. Any other grade will result in the cam chain /oil pump failure
Looked after carefully the Accord diesels can be rewarding to own and drive.
The rear callipers are the same on every Honda I have owned. They always seize when they aren't serviced regularly, but the ones on mine are lovely. The car rolls really smoothly and the hand brake holds the car nicely on hills.
Thebusofwoe: That is really strange that you see a lot of the failures on the tourer. Are the majority of them pre face lift (03-05)?? are the majority of the tourers you see tow trailers? (one of the theories that the drive shafts fail too - additional load)
Thanks mate. Had the massive help of Honda Karma forum. Loaded with so much info on this car. It has been the bible for the last couple months. LOL.Feck me, nice going matey. I was waiting for you to say that you was going to leave the fuel filter. We all try and avoid jobs with these at our placedefinitely a pain in the arse job to do. Well done on getting the shorter belt on. This is killing alternators on the cars that haven't had the mod.

well done chap


and a quick thank you to @PerformanceAutoworksfor changing the fuel filter, belt mod and brake bleeding
thankfully most of the maintenance have been taken care of now. Probably do with some new brake pads and the installation of parking sensors which I have waiting
@Thebusofwoe
I am also looking to get an OBDII reader and looking at the foxwell NT630 or NT614
Will these tools read the ABS and sub modules on the Accord?
How about the Autell MD802??
Any recommendations??
I do agree though - I think if I didn't have my Prelude then I would have gone for 2.4 Type S but having both a H22 and K24 would have burnt serious holes in my wallet. Some may argue that with the diesel issues it will balance out but the insurance and road tax is definitely cheaper on the diesel. Lots of open arguments here - LOL
Thanks all for the comments
Last edited by prelude_h22 on Wed Jun 11, 2014 5:51 pm, edited 1 time in total.
- wurlycorner
- Ye are glad to be dead, RIGHT?
- Posts: 21383
- Joined: Sat May 19, 2012 3:33 pm
- My Generation: 4G
- Location: Chelmsford, Essex
- Has thanked: 2257 times
- Been thanked: 282 times
Agreed, dual mass flywheels just seem to be a nightmare on everything, from whatever I read about them.
Just an excuse for clutch changes to be extortionate these days.
Just an excuse for clutch changes to be extortionate these days.
Last edited by wurlycorner on Wed Jun 11, 2014 4:31 am, edited 1 time in total.
--
Iain.
Iain.
Super Secret 1G (not really super secret!)
- prelude_h22
- Posts: 758
- Joined: Tue Jul 24, 2012 6:35 pm
- My Generation: 5G
- Has thanked: 8 times
- Been thanked: 22 times
Root Cause of Steering Wheel Vibration
Date: 3rd July 2014
Hi all, Just a quick update.
Since I have owned the Accord I have been getting a vibration at the steering wheel at around 65 – 75 mph. It varies in vibration strength occasionally but it is quite noticeable at that speeds. I have been avoiding these speeds where possible to minimise discomfort and any potential damage the vibrations could be causing.
Quick and easiest diagnosis suggests wheel balancing so I went to my mate to works at Northway tyres and he re-balanced them for me. Wheel weight results from the machine inner and outer was definitely zero. I drove home that day and the vibration was still present, a little reduced but still there.
I then thought maybe the wheel machine at my mates work was not accurate or not calibrated properly so I took the car to another wheel /tyre place locally to me and then they re-balanced the wheels. They said the wheels were fine and balanced ok. I drove home and tested the car on the dual carriage way and again the vibration was there.
Quite annoyed and worried at this point as I am thinking the problem could be more serious or could potentially be the known dreaded I-CDTI drive shafts issue.
Then last weekend I wanted to double check and ensure all wheels on the car were not buckled, surely the guys at the wheel garages check for this but it turns out that they don’t. I jacked up the corner of the car one at time and rotated each wheel and visually inspected the outer and inner rim for any defects.
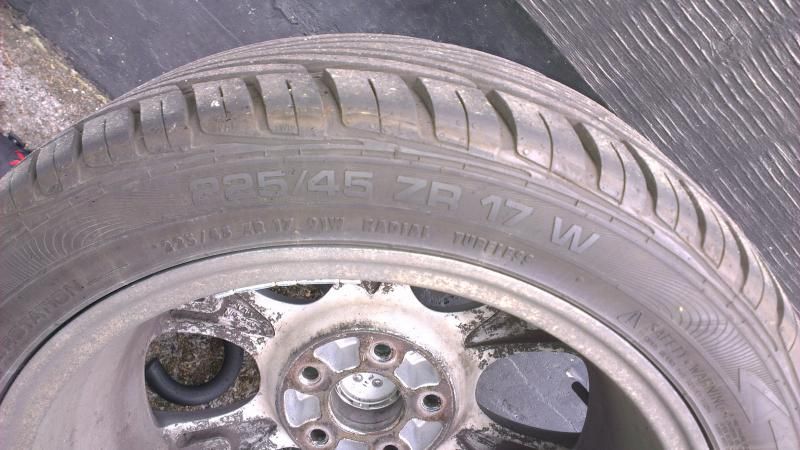
RESULT !! , It turned out that the front driver’s side wheel had a slight flat spot on the inner side of the rim. I was so relieved and knew 99.9% that this was the cause of the wheel vibration.
Flat spot is just below the 45 on the image below
Video of the buckled wheel now installed at the rear
[youtube]FzzAMjVnhkw[/youtube]
I then swapped the defected front drivers wheel with the wheel on the rear and took it out on a test drive.
Vibrations at the steering wheel are now all eliminated. It drives so smooth now and also relived that the drives shafts are ok.
The defected wheel at the rear shouldn’t cause any long term issues – Hopefully
It also goes to show that even if the wheel has a slight buckle it can still balance up ok.
I am also quite surprised that my mate didn’t spot the flat spot on the wheel as it would be quite noticeable on the wheel machine when it is spinning.
Nonetheless an excellent result.
Hi all, Just a quick update.
Since I have owned the Accord I have been getting a vibration at the steering wheel at around 65 – 75 mph. It varies in vibration strength occasionally but it is quite noticeable at that speeds. I have been avoiding these speeds where possible to minimise discomfort and any potential damage the vibrations could be causing.
Quick and easiest diagnosis suggests wheel balancing so I went to my mate to works at Northway tyres and he re-balanced them for me. Wheel weight results from the machine inner and outer was definitely zero. I drove home that day and the vibration was still present, a little reduced but still there.
I then thought maybe the wheel machine at my mates work was not accurate or not calibrated properly so I took the car to another wheel /tyre place locally to me and then they re-balanced the wheels. They said the wheels were fine and balanced ok. I drove home and tested the car on the dual carriage way and again the vibration was there.
Quite annoyed and worried at this point as I am thinking the problem could be more serious or could potentially be the known dreaded I-CDTI drive shafts issue.
Then last weekend I wanted to double check and ensure all wheels on the car were not buckled, surely the guys at the wheel garages check for this but it turns out that they don’t. I jacked up the corner of the car one at time and rotated each wheel and visually inspected the outer and inner rim for any defects.
RESULT !! , It turned out that the front driver’s side wheel had a slight flat spot on the inner side of the rim. I was so relieved and knew 99.9% that this was the cause of the wheel vibration.
Flat spot is just below the 45 on the image below

Video of the buckled wheel now installed at the rear
[youtube]FzzAMjVnhkw[/youtube]
I then swapped the defected front drivers wheel with the wheel on the rear and took it out on a test drive.
Vibrations at the steering wheel are now all eliminated. It drives so smooth now and also relived that the drives shafts are ok.
The defected wheel at the rear shouldn’t cause any long term issues – Hopefully
It also goes to show that even if the wheel has a slight buckle it can still balance up ok.
I am also quite surprised that my mate didn’t spot the flat spot on the wheel as it would be quite noticeable on the wheel machine when it is spinning.
Nonetheless an excellent result.
Last edited by prelude_h22 on Sat Sep 12, 2015 7:35 pm, edited 2 times in total.
- mercutio
- LotM Winner
- Posts: 14958
- Joined: Sun Aug 08, 2010 8:45 pm
- My Generation: 5G
- Location: Sunny Manchester
- Has thanked: 1 time
- Been thanked: 3 times
- Contact:
putting the buckled one at the back and not fixing it will eventually cause you problems as the wobble will see your wheel bearing out
bristol_bb4 wrote:ahhh a 5th gen, i love 5th gens
Dino wrote:I loves the 5th gen really.... just dont quote me on it...
4thgenphil wrote:Mines 4 1/4 unches mate, sorry
http://www.ludegeneration.co.uk/profile ... -t618.html
- prelude_h22
- Posts: 758
- Joined: Tue Jul 24, 2012 6:35 pm
- My Generation: 5G
- Has thanked: 8 times
- Been thanked: 22 times
Re: My Honda Accord 2006 I-CDTI 4 Door Ex Diesel Saloon
Yeah, it will hopefully be short term. Will try to source a new old stock rim on ebay maybe.putting the buckled one at the back and not fixing it will eventually cause you problems as the wobble will see your wheel bearing out
Should be plenty of these rims around.
Don't like the idea of the rear bearing going as these bearings aren't cheap - lol
- prelude_h22
- Posts: 758
- Joined: Tue Jul 24, 2012 6:35 pm
- My Generation: 5G
- Has thanked: 8 times
- Been thanked: 22 times
Rear Parking Sensor Install
Hi All
I have now managed to find the time to install a set of dolphin parking sensors onto my Honda Accord.
The missus got me a parking sensor kit as an anniversary present this year but up until now I didn’t have the time to install them.
The kit she bought me was the dolphin parking sensor kit in gloss black which was the best match to the Honda Accord night hawk black paint work.
The kit can be bought here
http://www.dolphin-direct.co.uk/product ... stem-audio
and after reading many positive reviews and also great customer service with lifetime warranty on all components it was the one to go for. The kit also features detachable sensors which allowed sensors to be replaced without having to remove the entire loom to the main control box.
Dolphin Sensor Parking Kit
Model: DPS400
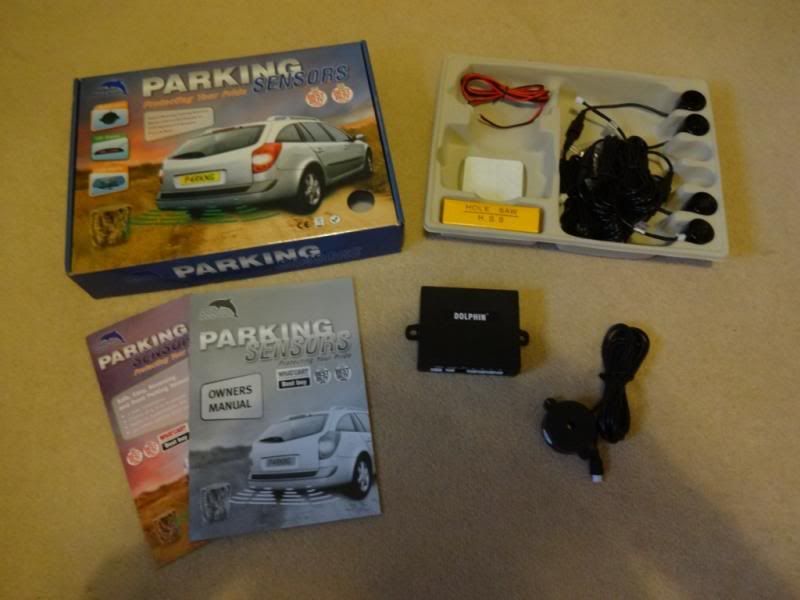
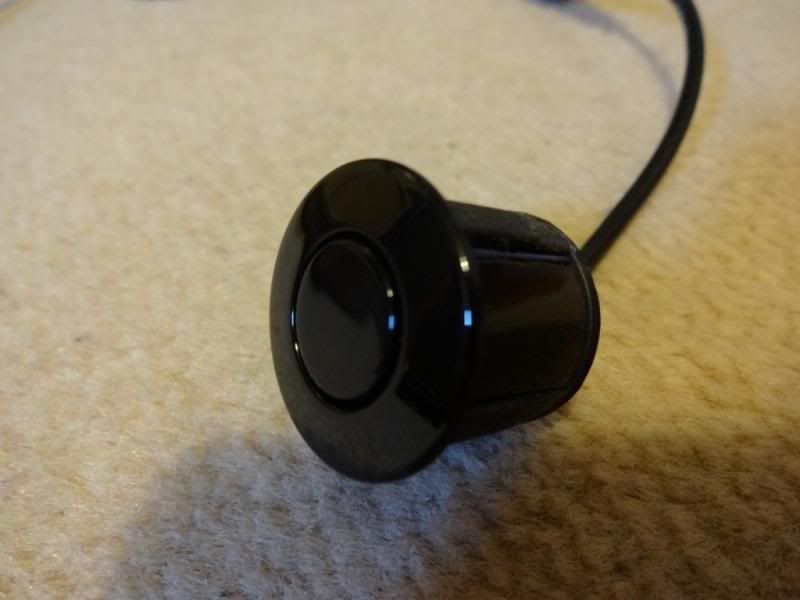
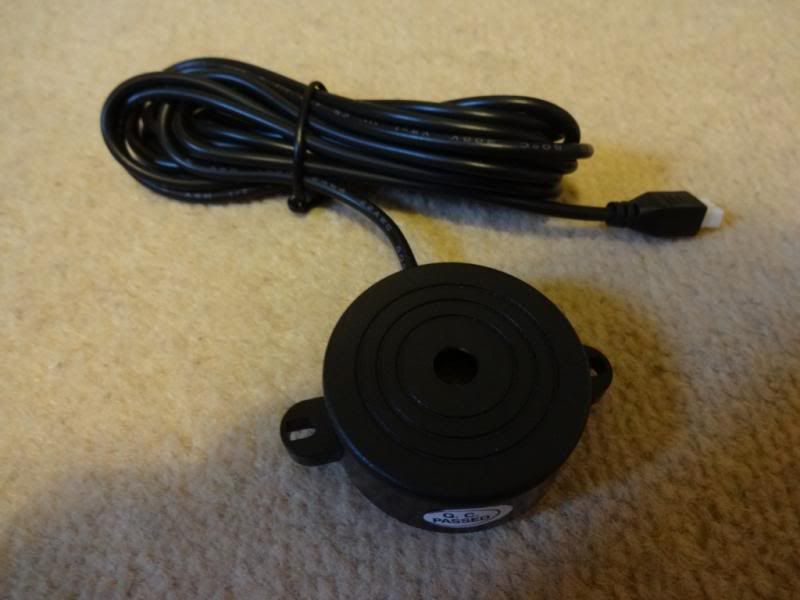
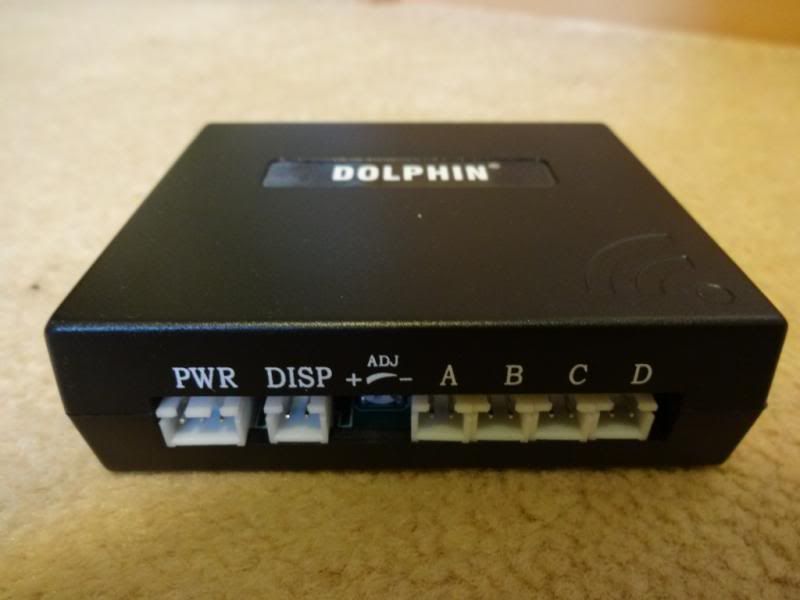
The kit came with everything needed to get the system up and running and with a two wire connection the electrics is pretty easy.
After reading up on a few threads about the subject I was pretty confident in getting them installed. There was a worry in my mind about drilling into the bumper as it would only be a one time shot otherwise the bumper would be knackered, but triple checking measurements was key.
I gathered some tools which were required
- Cordless Bosch drill (and various drill bits)
- Masking tape
- Marker pen
- Cable ties (various sizes)
- Some string
- Something heavy to attach to the string (used an old padlock)
- Tape measure
- Scotchlocks
- Screwdrivers
- 10mm socket wrench
- Parking Sensor Kit (include hole saw for the sensors)
First job was to apply masking tape on the rear bumper, this gave a good surface to mark your measurements on and protects the paint work when drilling the holes
The bumper was gently cleaned to remove any dirt to allow the masking tape to have a good clean surface to adhere too
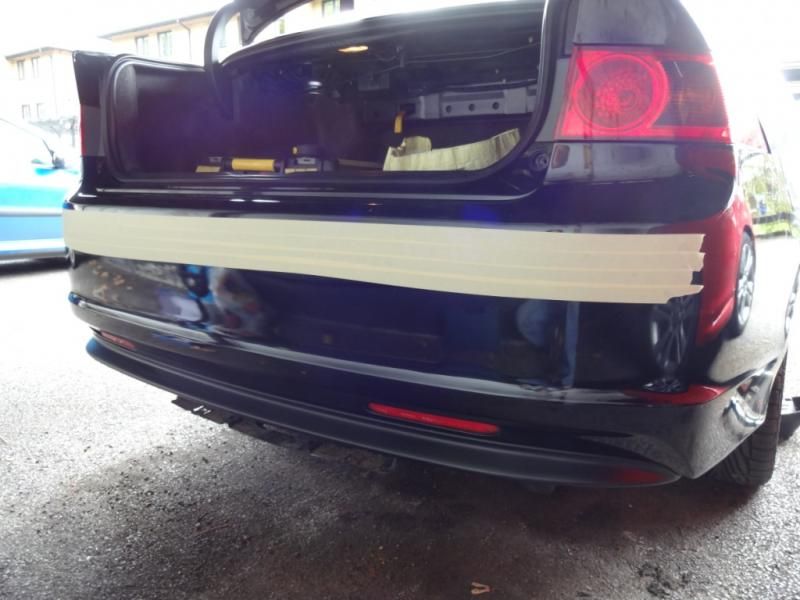
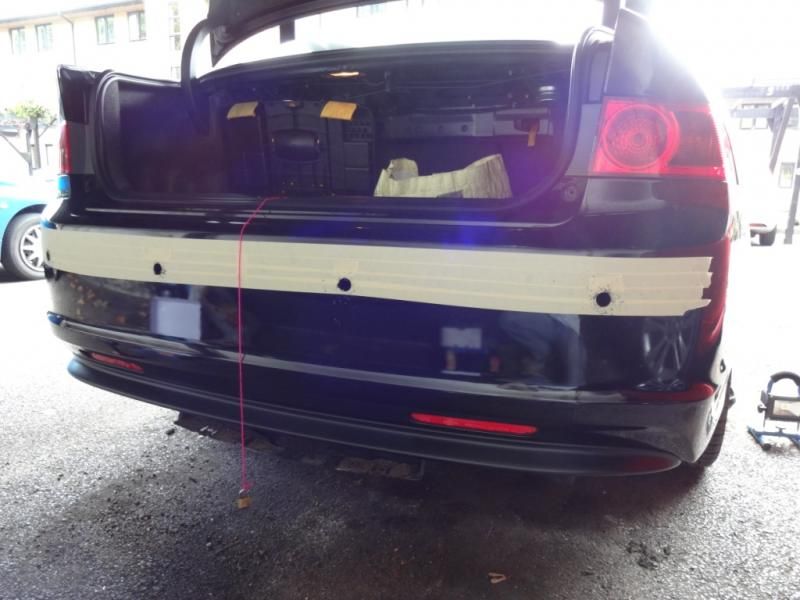
I then attached the string to the boot catch and tied a padlock to the end of the string. I then dangled it down. This now gives a good indication of the centre of the bumper.
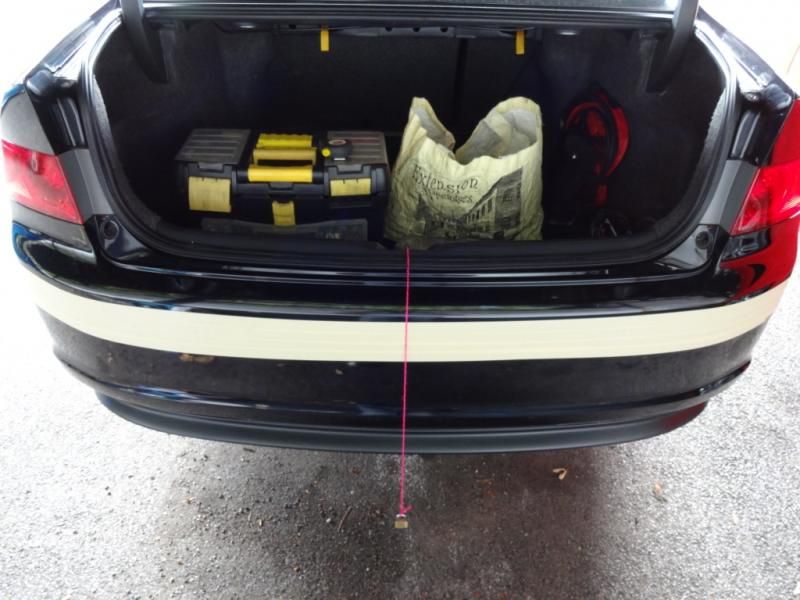
Now it was time to measure up the sensor positions. I used the measurements
400mm + 200mm (CENTRE OF BUMPER) 200mm + 400mm
The height I decided on was 610mm from the ground
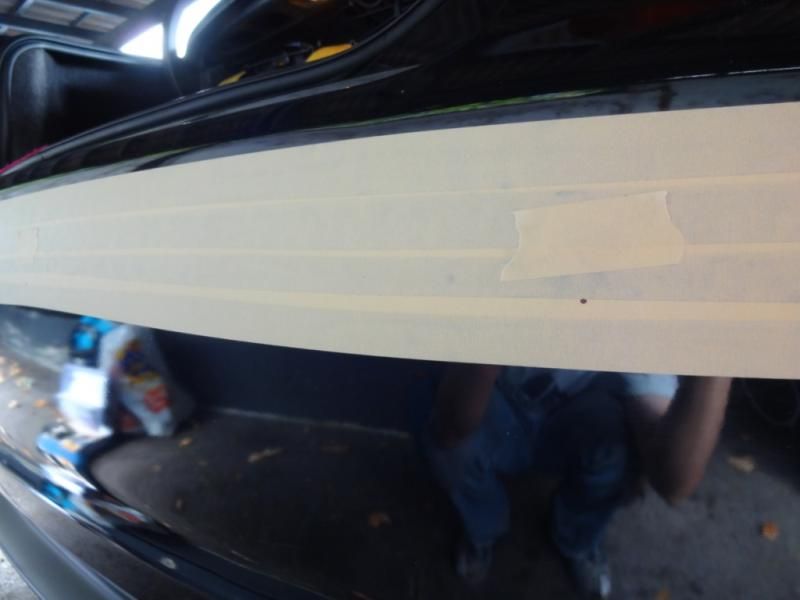
Once the measurements were triple checked and I was confident there were no errors it was time to drill.
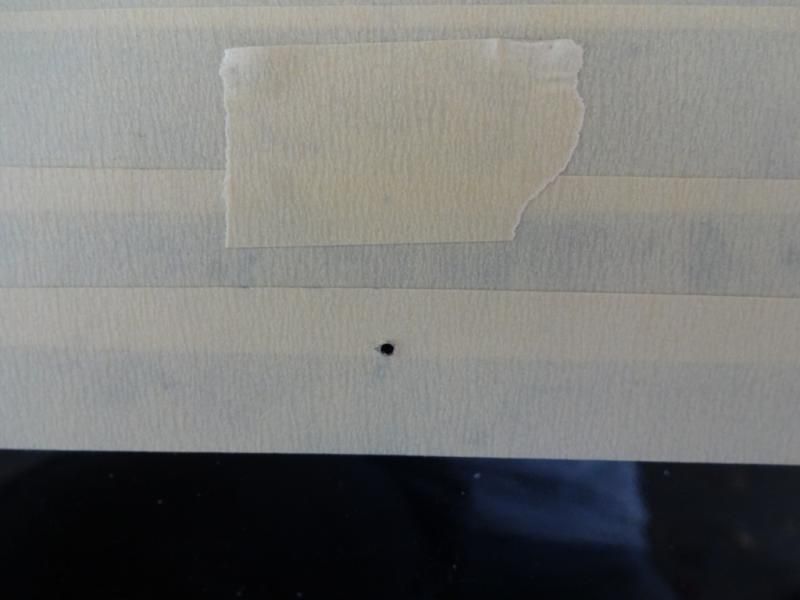
First I made a pilot hole using a 3mm drill bit
Then upped it to 6mm
Then I attached the hole saw, the pilot holes gave the hole saw a good accurate drill action so the drill couldn’t wonder off and cause damage etc
It was relatively easy, the drill and the hole saw did all the work with only light pressure being applied
Once all four holes were completed I was happy with the finish. The holes were clean cut and no ragged edges were present.
Pilot Hole
Sensor Holes Complete
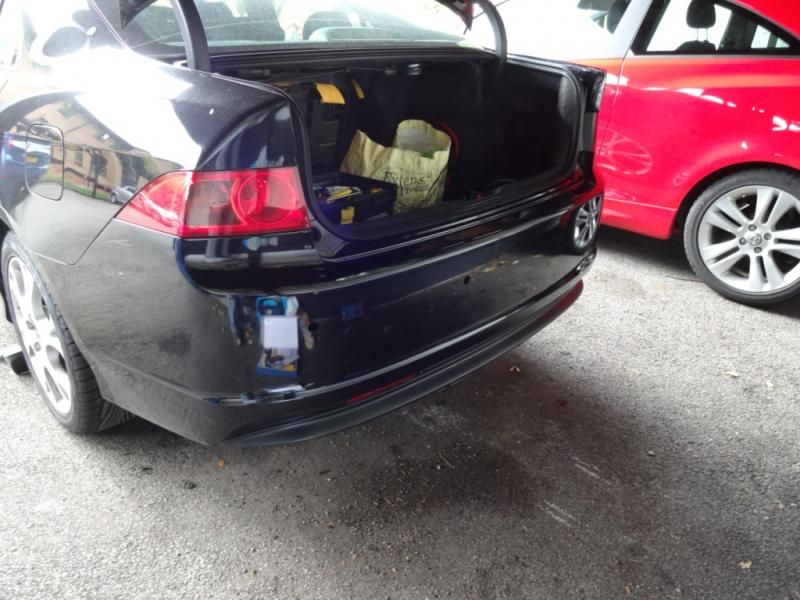
With masking tape removed
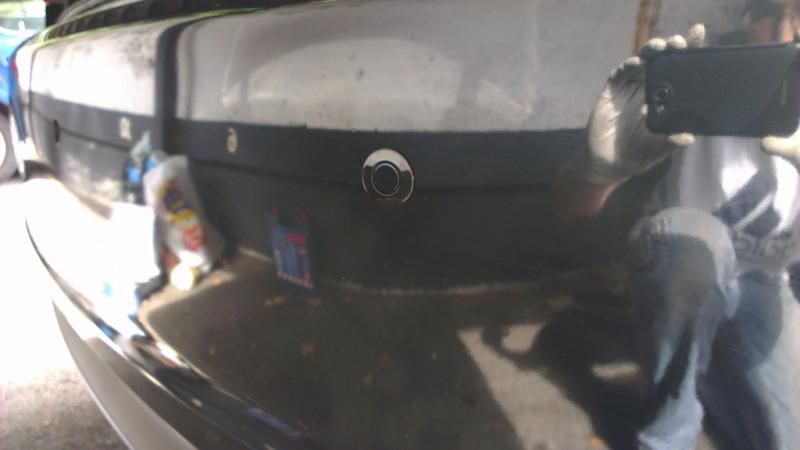
At this point I fitted the sensors in to the holes; I inserted the wires though first and then gently pushed the sensors into the holes. The rubber lining on the sensor body provided a smooth snug tight fit. Very impressed J
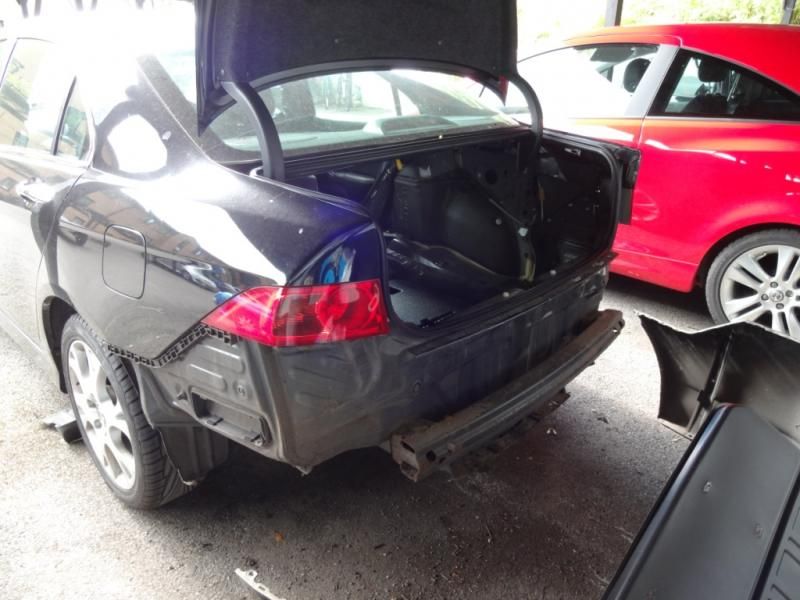
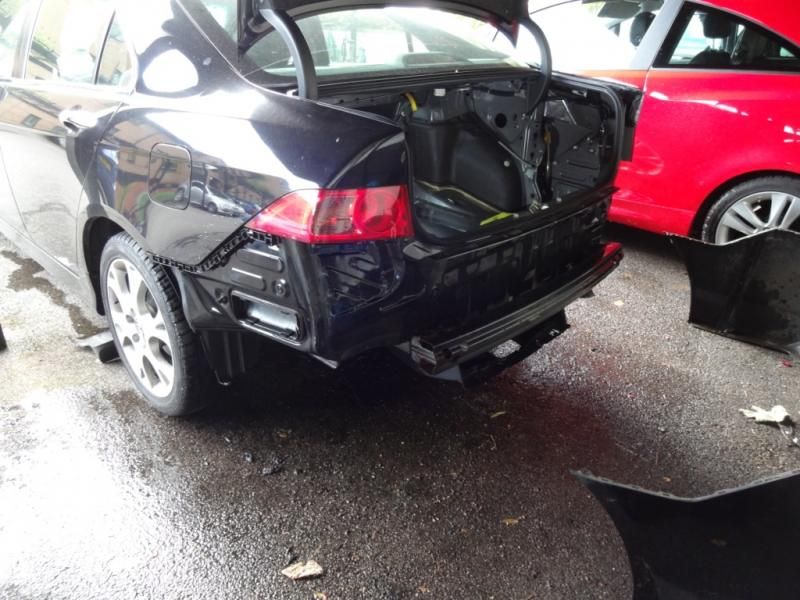
Once all the sensors were fitted it was time to remove the bumper
It was very simple, it consisted of two 10mm bolts located under cover caps next to the light clusters and 3 Philips head screws around each arch. I also had mudflaps so these had to be removed aswell. There are a couple clips on the under side of the bumper which attaches to the rear diffuser.
The bumper unclips from the sides and it pulls away.
Whilst the bumper was off I took this opportunity to clean out all the mud and dirt from the areas behind the bumper
I used my mobi V17 portable pressure washer
Bumper Removed
Bumper itself
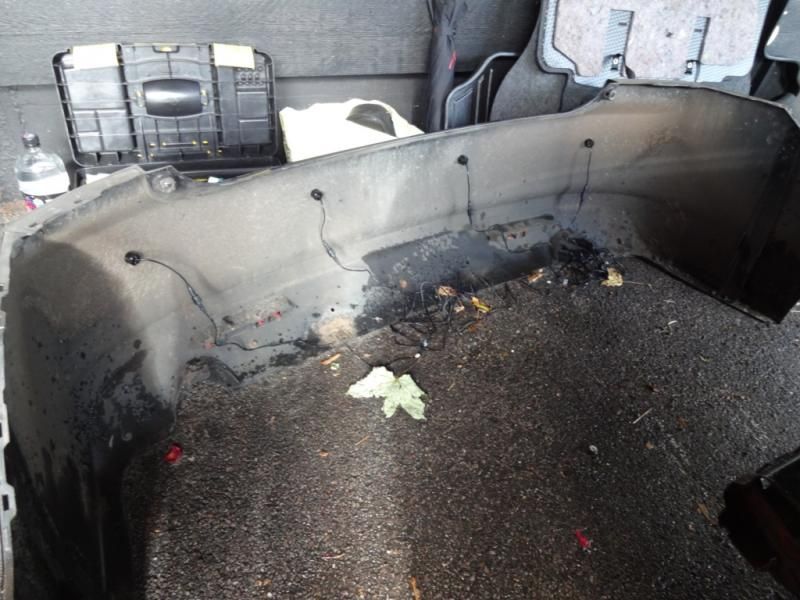
After a quick jet wash cleaning all dirt, mud and grime
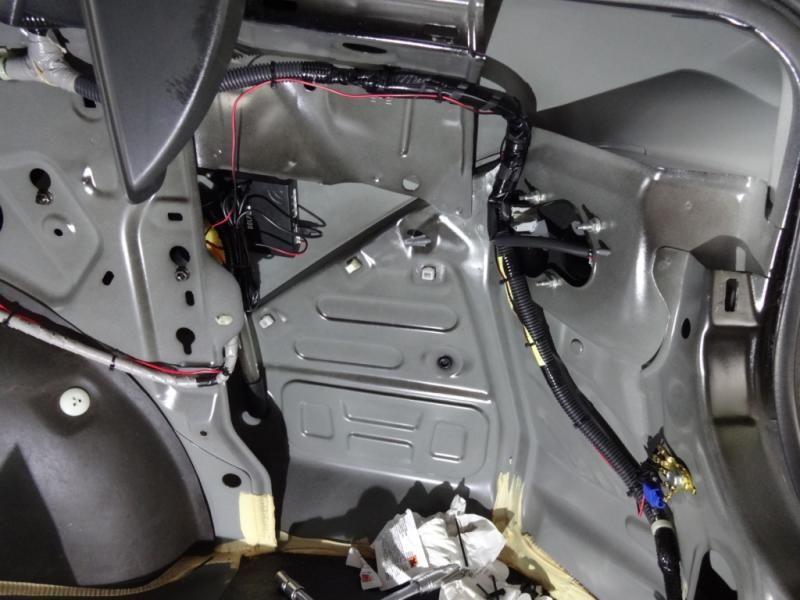
At this point I decided it was time to remove the boot interior, I removed the carpeted side of the drivers boot interior. Once off, the cars wire loom harness was revealed. I found a suitable location for the parking sensor brain box and attached it using the supplied double sided tape. The speaker buzzer was placed on top of the alarm siren also located very closely. The surfaces for both locations were thoroughly cleaned to give a good long lasting adhesion.
Pic of Boot with interior trim removed
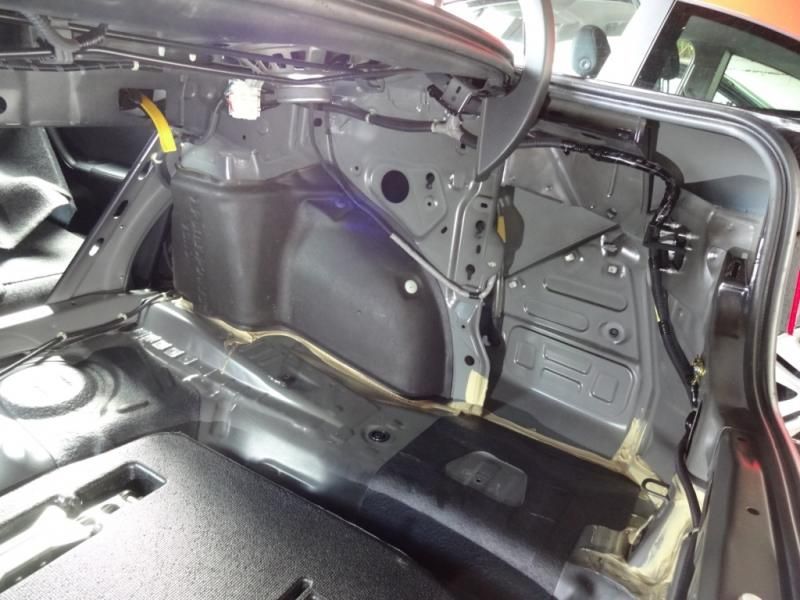
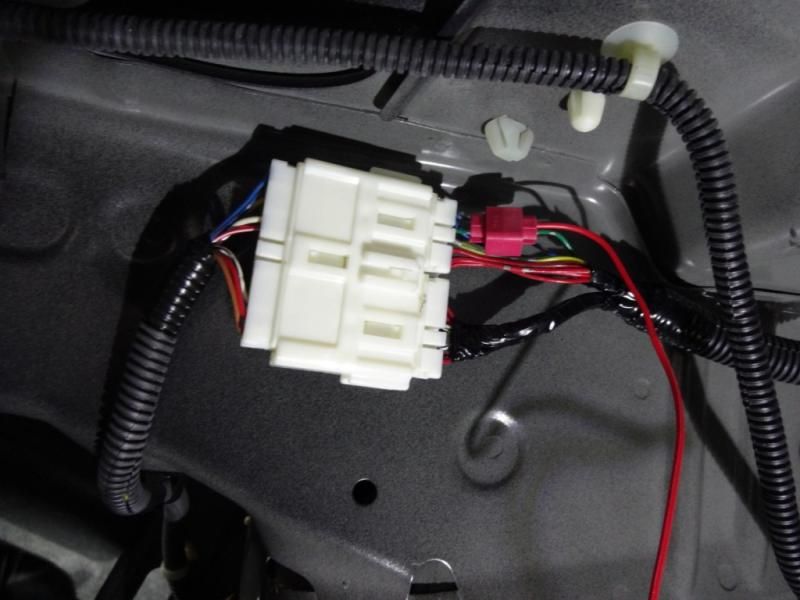
For the parking sensor power supply, the positive red power cable was connected to the green solid wire on a large white connector harness located on the back of the driver’s rear passenger seat. This is the cable feed for the reverse light. I used a scotch lock to tap into this connection.
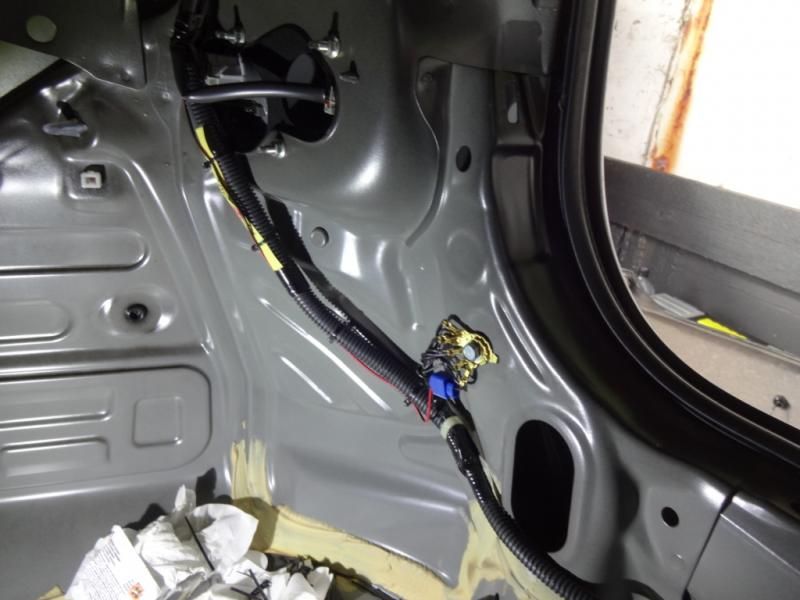
With the negative connection I used the main OEM ground connection located at the front of the boot. Again I used a scotch lock to tap into the ground connection here.
I neatly routed all wires using cable ties
Pic showing Positive and negative connections complete and brain box location
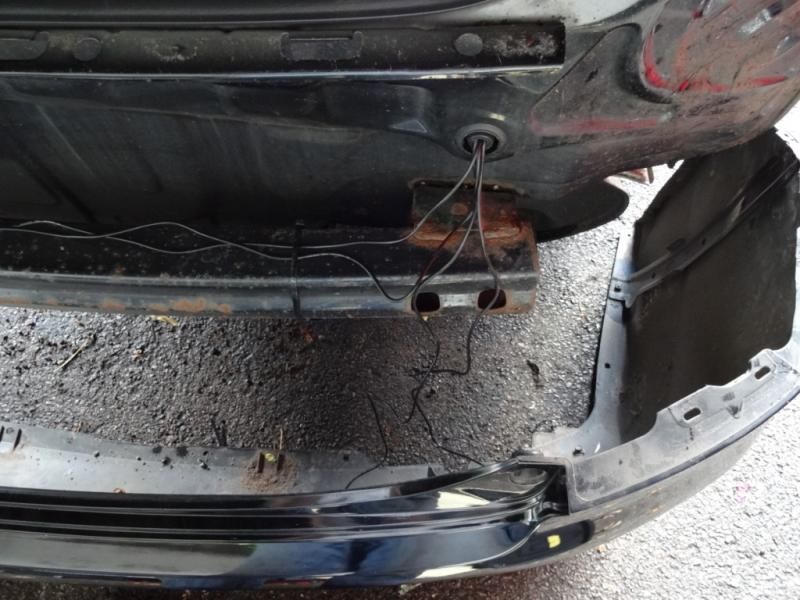
Then it was time to connect up all the sensors, first I needed to route the cables into the boot. A grommet was located behind the bumper, there are two but the obvious choice was the one on the driver’s side. A hole was drilled into the grommet to allow all four sensor connectors and its wires to pass through.
Once the cables were in the boot they fed back to the brain box where all the wires was neatly routed and tided up.
A quick test by putting the car in pre-ignition and selecting reverse showed everything was working well.
Before putting the bumper back the sensor cables was tied to the rear bumper beam
Grommet with sensor wires passed through
Sensor wires attached to the bumper beam
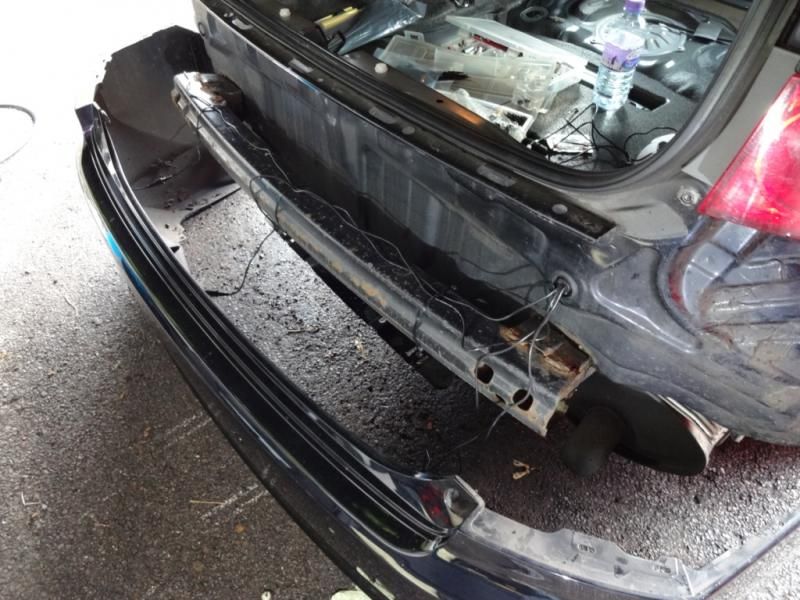
All wiring cable tied and neatened
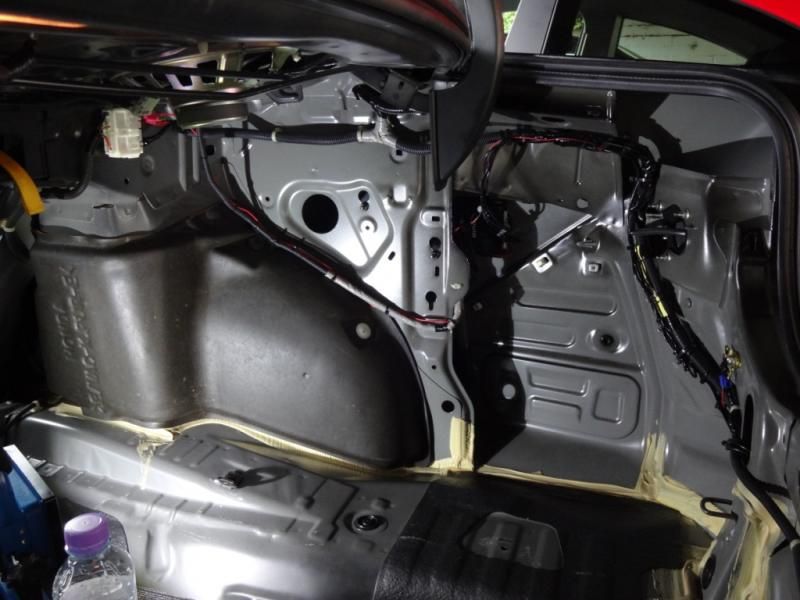
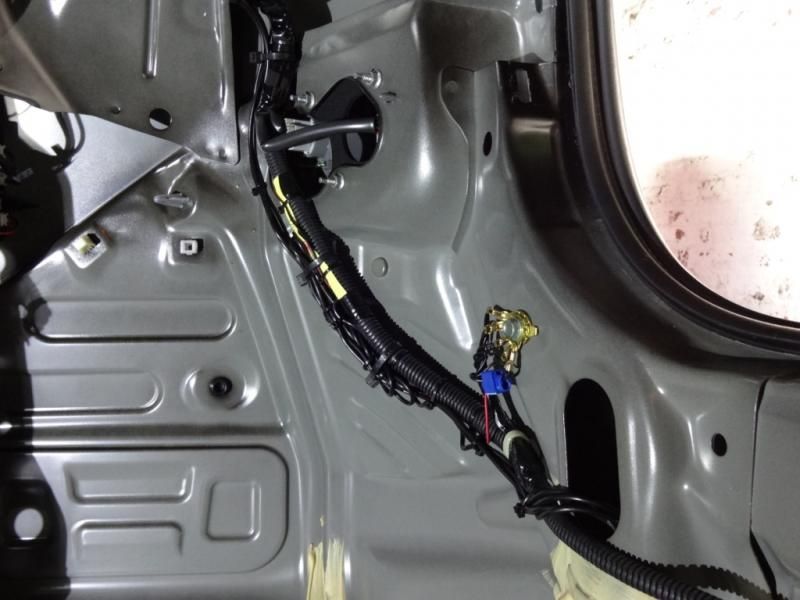
Once complete the bumper was re-installed
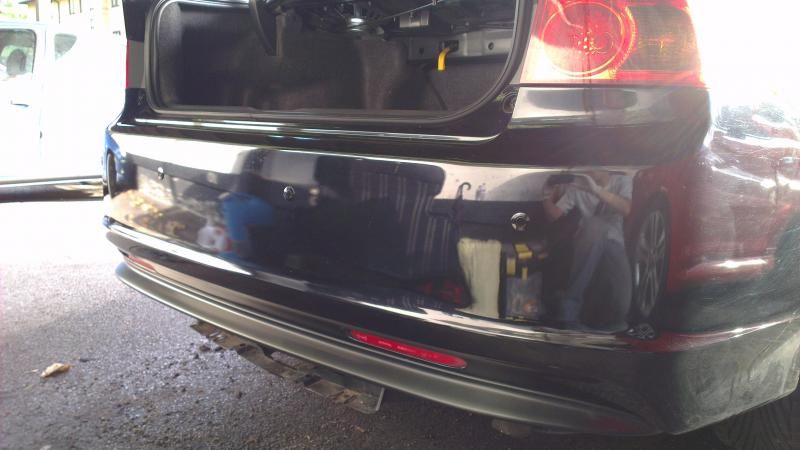
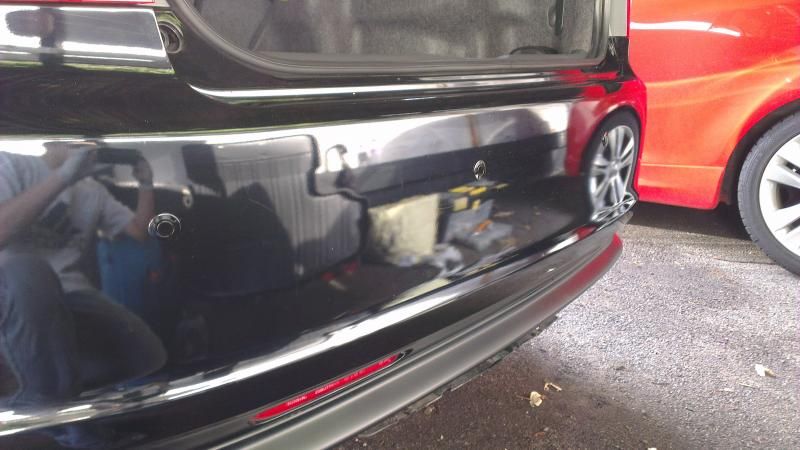
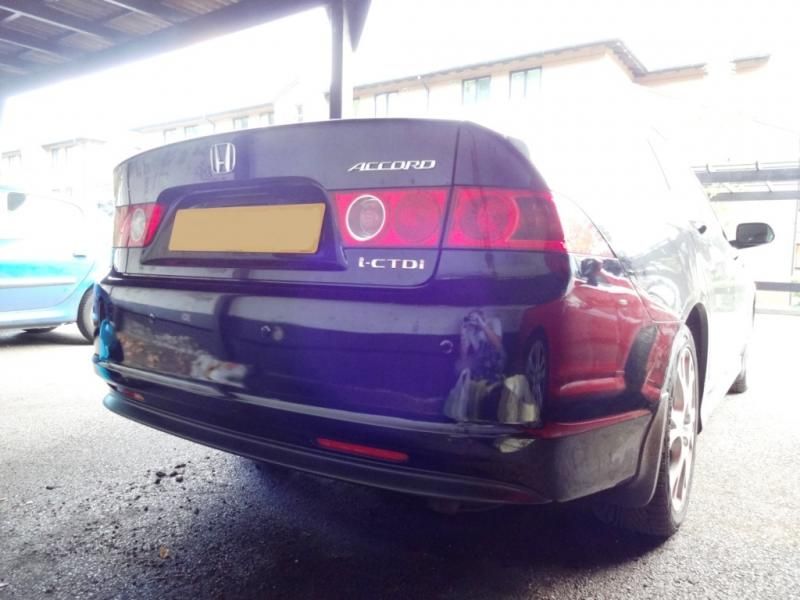
Once complete the system was tested again to check for adjustments.
The brain box was adjusted to minimum sensitivity which gave a good sized gap before the constant beep sounded.
After this the boot interior was re-installed
They work really well and really happy how the installation turned out
The only real worry was the drilling but the key here is to double check all the measurements and take your time
The sensors really match the paint work well and look as close to OEM as the real thing. You probably couldn’t tell the difference.
Highly recommended kit
I have now managed to find the time to install a set of dolphin parking sensors onto my Honda Accord.
The missus got me a parking sensor kit as an anniversary present this year but up until now I didn’t have the time to install them.
The kit she bought me was the dolphin parking sensor kit in gloss black which was the best match to the Honda Accord night hawk black paint work.
The kit can be bought here
http://www.dolphin-direct.co.uk/product ... stem-audio
and after reading many positive reviews and also great customer service with lifetime warranty on all components it was the one to go for. The kit also features detachable sensors which allowed sensors to be replaced without having to remove the entire loom to the main control box.
Dolphin Sensor Parking Kit
Model: DPS400


The kit came with everything needed to get the system up and running and with a two wire connection the electrics is pretty easy.
After reading up on a few threads about the subject I was pretty confident in getting them installed. There was a worry in my mind about drilling into the bumper as it would only be a one time shot otherwise the bumper would be knackered, but triple checking measurements was key.
I gathered some tools which were required
- Cordless Bosch drill (and various drill bits)
- Masking tape
- Marker pen
- Cable ties (various sizes)
- Some string
- Something heavy to attach to the string (used an old padlock)
- Tape measure
- Scotchlocks
- Screwdrivers
- 10mm socket wrench
- Parking Sensor Kit (include hole saw for the sensors)
First job was to apply masking tape on the rear bumper, this gave a good surface to mark your measurements on and protects the paint work when drilling the holes
The bumper was gently cleaned to remove any dirt to allow the masking tape to have a good clean surface to adhere too

I then attached the string to the boot catch and tied a padlock to the end of the string. I then dangled it down. This now gives a good indication of the centre of the bumper.

Now it was time to measure up the sensor positions. I used the measurements
400mm + 200mm (CENTRE OF BUMPER) 200mm + 400mm
The height I decided on was 610mm from the ground

Once the measurements were triple checked and I was confident there were no errors it was time to drill.
First I made a pilot hole using a 3mm drill bit
Then upped it to 6mm
Then I attached the hole saw, the pilot holes gave the hole saw a good accurate drill action so the drill couldn’t wonder off and cause damage etc
It was relatively easy, the drill and the hole saw did all the work with only light pressure being applied
Once all four holes were completed I was happy with the finish. The holes were clean cut and no ragged edges were present.
Pilot Hole

Sensor Holes Complete

With masking tape removed

At this point I fitted the sensors in to the holes; I inserted the wires though first and then gently pushed the sensors into the holes. The rubber lining on the sensor body provided a smooth snug tight fit. Very impressed J

Once all the sensors were fitted it was time to remove the bumper
It was very simple, it consisted of two 10mm bolts located under cover caps next to the light clusters and 3 Philips head screws around each arch. I also had mudflaps so these had to be removed aswell. There are a couple clips on the under side of the bumper which attaches to the rear diffuser.
The bumper unclips from the sides and it pulls away.
Whilst the bumper was off I took this opportunity to clean out all the mud and dirt from the areas behind the bumper
I used my mobi V17 portable pressure washer
Bumper Removed

Bumper itself

After a quick jet wash cleaning all dirt, mud and grime

At this point I decided it was time to remove the boot interior, I removed the carpeted side of the drivers boot interior. Once off, the cars wire loom harness was revealed. I found a suitable location for the parking sensor brain box and attached it using the supplied double sided tape. The speaker buzzer was placed on top of the alarm siren also located very closely. The surfaces for both locations were thoroughly cleaned to give a good long lasting adhesion.
Pic of Boot with interior trim removed

For the parking sensor power supply, the positive red power cable was connected to the green solid wire on a large white connector harness located on the back of the driver’s rear passenger seat. This is the cable feed for the reverse light. I used a scotch lock to tap into this connection.

With the negative connection I used the main OEM ground connection located at the front of the boot. Again I used a scotch lock to tap into the ground connection here.

I neatly routed all wires using cable ties
Pic showing Positive and negative connections complete and brain box location

Then it was time to connect up all the sensors, first I needed to route the cables into the boot. A grommet was located behind the bumper, there are two but the obvious choice was the one on the driver’s side. A hole was drilled into the grommet to allow all four sensor connectors and its wires to pass through.
Once the cables were in the boot they fed back to the brain box where all the wires was neatly routed and tided up.
A quick test by putting the car in pre-ignition and selecting reverse showed everything was working well.
Before putting the bumper back the sensor cables was tied to the rear bumper beam
Grommet with sensor wires passed through

Sensor wires attached to the bumper beam

All wiring cable tied and neatened


Once complete the bumper was re-installed


Once complete the system was tested again to check for adjustments.
The brain box was adjusted to minimum sensitivity which gave a good sized gap before the constant beep sounded.
After this the boot interior was re-installed
They work really well and really happy how the installation turned out
The only real worry was the drilling but the key here is to double check all the measurements and take your time
The sensors really match the paint work well and look as close to OEM as the real thing. You probably couldn’t tell the difference.
Highly recommended kit
Last edited by prelude_h22 on Sat Sep 12, 2015 7:36 pm, edited 2 times in total.
